
6 tips using Apollo GraphQL
We’re using the awesome Apollo client and server libraries in Node.js & React / React Native apps. They’ve been reliable, full featured and mostly easy to use - albeit with reasonable learning curve. Which is totally understandable since they are doing a lot for you.
Here are a few items that we didn’t immediately see in the documentation, didn’t understand the importance of, or found we needed during development and roll out to production.
- GraphQL vs the libraries
- Debugging with Postman & Chrome dev tools
- Logging
- Simple Authentication and Authorization
- Caching
- Querying only selected fields from the database
- Summary
GraphQL vs the libraries
The Apollo libraries do a lot of heavy lifting for you. This makes it easier to get started, but with this help and abstraction you can easily get lost as to what the libraries are doing and what is just plain GraphQL. We found it important to understand what functionality was provided by the libraries vs what is plain GraphQL. It’s worth reading (or at least skimming) the official GraphQL spec.
GraphQL Playground
The playground is invaluable in playing around with queries and mutations.
Add your
AuthorizationHTTP header to query anything that is not public in your graph/api.
{
  "Authorization": "Bearer eyJhbGciOiJIUzI....."
}
Raw GraphQL
Tools like the playground make it easy to get comfortable with the language by viewing, executing and testing GraphQL. It’s also worth noting that you don’t need to use the client libraries at all.
Once you understand the language syntax, you can also write queries or mutations without using the client libraries at all. For example, here we’re calling a mutation using plain old JavaScript.
const refreshToken = apiUri => () => {
  return fetch(apiUri, {
    method: 'POST',
    headers: { 'Content-Type': 'application/json' },
    body: JSON.stringify({
      operationName: 'authRefresh',
      query: `mutation authRefresh {
                authRefresh {
                  ok
                  data
                }
              }`
    })
  })
    .then(res => res.json())
    .catch(error => console.log(error.message));
};
Debugging with Postman & Chrome dev tools
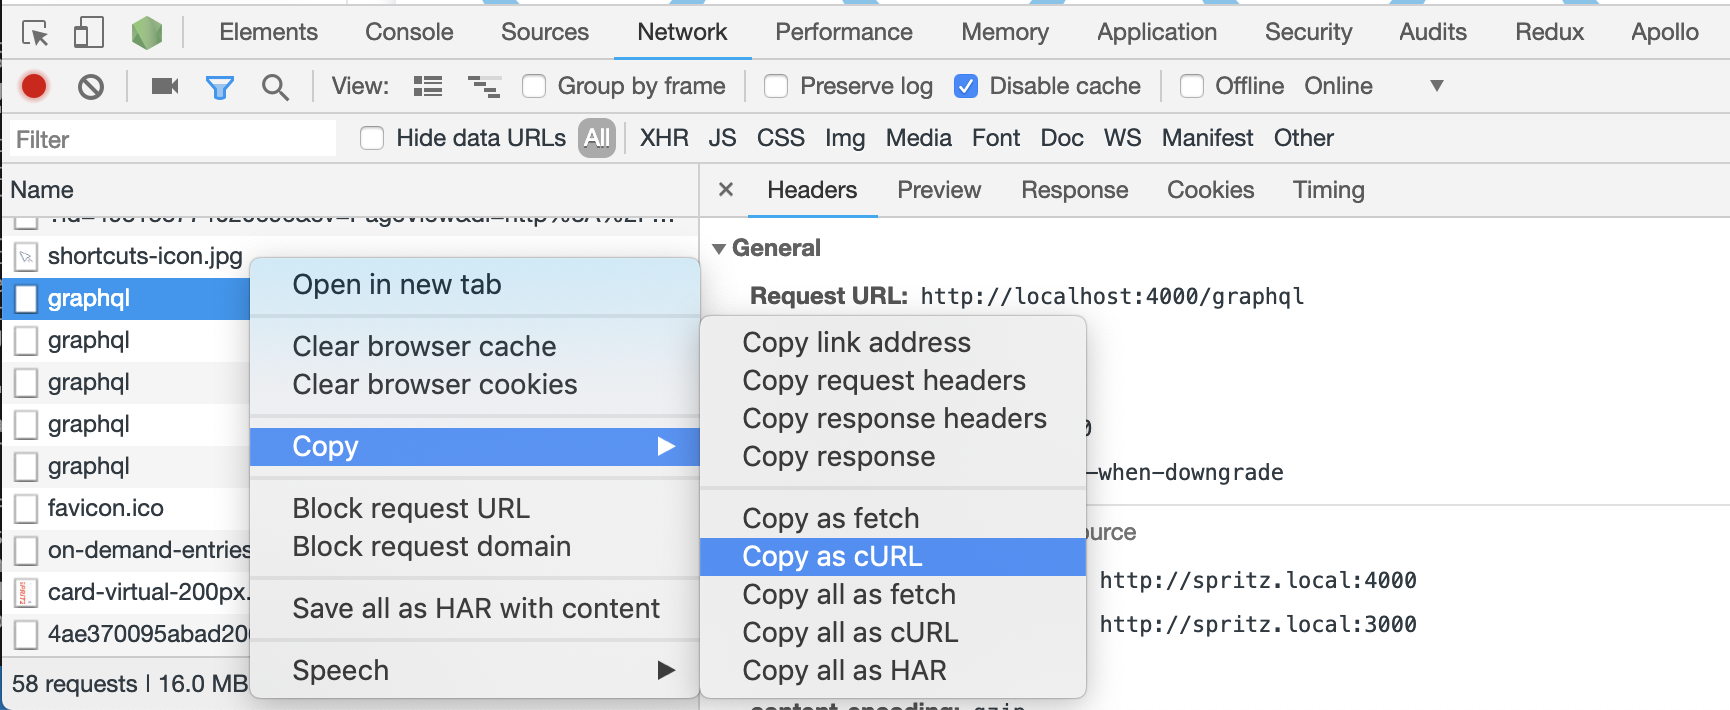
For further debugging head to Chrome’s network tools. Like any network call, you can see the full GraphQL request and response under the network tab.
Copy the request as cURL and directly import into the great Postman API editor (or API IDE?) for further debugging or manipulation.
Logging
It’s essential to log errors and requests. We found with the default setup, syntax errors and other issues became hard to debug unless we riddled our code with exception handling. We then found this feature of the Apollo server constructor, which allows logging (& modifying) errors and responses. This greatly helps with diagnosing syntax errors or issues that occur outside your resolvers.
const server = new ApolloServer({
  typeDefs,
  resolvers,
  context: graphQLContext,
  formatError: (error: any) => {
    // filter whatever errors your don't want to log
    console.error(`[GraphQL.error] ${error.message}`, error);
    return error;
  },
  formatResponse: (response: any) => {
    // don't log auth mutations or schema requests
    const name = Object.keys(get(response, 'data') || { unknown: 0 })[0];
    if (!['authSignIn', 'authRefreshToken', '__schema', ... ].includes(name)) {
      console.log(`[GraphQL.response] ${name}()`, response);
    }
    return response;
  }
});
There are more advanced logging techniques, but this is super simple to use from day 1 and can save a few debugging headaches.
Simple Authentication and Authorization
The GraphQL specification doesn’t cover authentication or authorization. It’s up to you how to implement it, which is great (you can choose whatever method best suits your situations), and could be annoying (as there isn’t a single best practice solution).
When starting our project, we initially had all GraphQL operations (API calls) public. We then added simple authentication via Express middleware, and started to pass an isAuthenticated flag down to all query and mutation resolvers.
  async user(_, args, context) {
    if (!context.isAuthenticated) {
      throw new AuthenticationError('Not authenticated.');
    }
    ...
While this works fine, it starts to get very messy as soon as the project started to grow. We then centralised these checks into the context using gql to parse the incoming operation. The gql command takes in the GraphQL string operation and returns a GraphQL object - with operation type, operation name and selected fields (via selectionSet).
const server = new ApolloServer({
  typeDefs,
  resolvers,
  context: graphQLContext
});

const graphQLContext = (context) => {
  const { req, res } = context;

  // use a express middleware to auth user
  const isAuthenticated = Boolean(req.user);

  const { name, operation } = getOperationName(req);

  // Check here if this a public operation
  if (!isAuthenticated && !isPublicOperation(name, operation)) {
    throw new AuthenticationError('Not authenticated.');
  }

  // Could also check role based authorization

  return {
    currentUser: req.user,
    isAuthenticated
  };
};

const getOperationName = (req) => {
  const query = req.body.query;

  // use gql to parse the given query/mutation
  const op = gql`
    ${query}
  `;

  // this is the name the user gave for the operation
  const operationNameDefault = get(req, 'body.operationName');

  // this is the name of the actual operation
  const name = get(op, 'definitions[0].selectionSet.selections[0].name.value') || operationNameDefault;
  const operation = get(op, 'definitions[0].operation') || '';

  return { name, operation };
};
There are more advanced authentication and authorization techniques, like using GraphQL schema directives.
Caching
Early on, we ran into issues when our logic became complicated and we started dealing with eternal systems/API’s. We needed to send out requests to multiple systems, then wait and combine the responses.
The natural tendency - especially coming from REST based API’s - was to just query more often. We would re-factor components to force this and changed the fetchPolicy for queries to be network-only.
We were working against GraphQL & Apollo. The solution to this growing complexity was to leverage the Apollo Cache (and subscriptions or polling)
The default fetchPolicy is cache-first (there could be an argument that cache-and-network should be the default). Cache-first checks if the requested data is in the cache, and if so, just returns it. It’s up to you to figure out if that data might be stale.
There are a few options to dealing with potentially stale data:
- Periodically clear the whole cache
- Bypass the cache using
network-only(or request a network call after checking the cachecache-and-network) - Prevent the cache becoming stale (see below for techniques)
- Set the cache directives using the cache control extension
It’s important to set up the cache when creating the Apollo Client. If you are using guid’s then it’s as easy as this, otherwise check out the InMemoryCache options.
  return new ApolloClient({
    link: ...,
    cache: new InMemoryCache({ dataIdFromObject: o => o.id })
  });
Once we understood how the cache works, everything became easier.
Our caching approach
- Understand exactly how each of the
fetchPolicyvalues work - Install the Chrome Apollo Client Developer extension. This allows inspecting the cache as well as queries and mutations.
- Consider the cache on every single call.
- Does it matter if this data comes from the cache?
- Or does it need to only come from the server?
- Keep track of what variables are used for queries. Each query is cached along with it’s variables
- Use
fetchMoreand the@connectiondirective to handle paginated data. - Consider the cache after every mutation.
- If we return the object that was updated/created, Apollo will automatically cache it for us.
- Manually handle when we insert new records.
- Determine if it’s better to update the cache manually after a mutation using writeQuery, or
refetchthe data from the server.
Querying only selected fields from the database
One item that annoyed us early on with our implementation was the number of SELECT * FROM ... occurring in our solution. We’re using a TypeORM (which is a solid ORM, still with all the tradeoffs and benefits of ORM’s..).
Here’s a super simple example.
Server
// define the graphql query
const UserQueryDefs = gql`
  extend type Query {
    user(id: ID): User
  }
`;

// graphql resolver
async user(_, args, context): Promise<any> {
  // return the requested user (returns the full User entity)
  return getRepository(User).findOne(args.id);
}
Client
// # graphql query operation requesting name field
query user {
  user(id: 123456) {
    name
  }
}
Running the query above will select all fields from the users table (via the TypeORM findOne method), then GraphQL Apollo server will throw away all the fields other than name and return just it to the client.
There is a solution to this, leveraging the info parameter on resolvers. The info parameter isn’t documented and Apollo recommend it should be used for advanced cases (we’ll see why shortly).
// graphql resolver which only selects
async user(_, args, context): Promise<any> {
  // get an array of selected fields
  const selectedFields = info.fieldNodes[0].selectionSet.selections.map((field: any) => field.name.value);

  // return the requested user - with only the selected fields
  return getRepository(User).findOne({
    select: selectedFields,
    where: { id: args.id }
  });
}
There are a few issues with the solution.
- Only works on the first level of the query. For example, this won’t handle situations where related entities are also requested. This can be solved through recursion.
- Doesn’t handle fragments.
- Using an undocumented feature of Apollo server, which may change.
This could be a great solution make some key operations as efficient as possible, without creating separate operations. But should only be used carefully with an understanding of the trade-offs.
Summary
These are a few tips and tricks that we picked up over time. Hopefully you’ll find some of them useful.
Please note, these examples are all simplifications, and are not production ready!